Wednesday, October 26, 2011

Collecting Leaves


We have been enjoying the fall season, whether taking a walk around the block, playing out back, or going to the playground. We even visited High Park Playground (which we haven't done for a very long time). We met Marlaine and the twins there. The twins and the 3 older boys are actually all on the slide in the photo above.


Above, the big boys are gluing foam ABC's, dinosaurs, farm animals, stars and trains while Oscar roams around on the floor. Actually, he has recently been pulling himself to a standing position! One of his new favourite activities is standing at Noah's bedroom window, enjoying the view.


One day, I gave each of the kids a brown paper bag with their name on it, and we all went outside to collect leaves. We went around a different, larger block so that we would have more variety to choose from. For the first half of the block, Noah walked and collected leaves. He got so passionate about it that he started picking up nearly every leaf, regardless of its quality. But who says a few dried pieces of leaf desperately hanging onto a stem isn't quality? Not Noah!
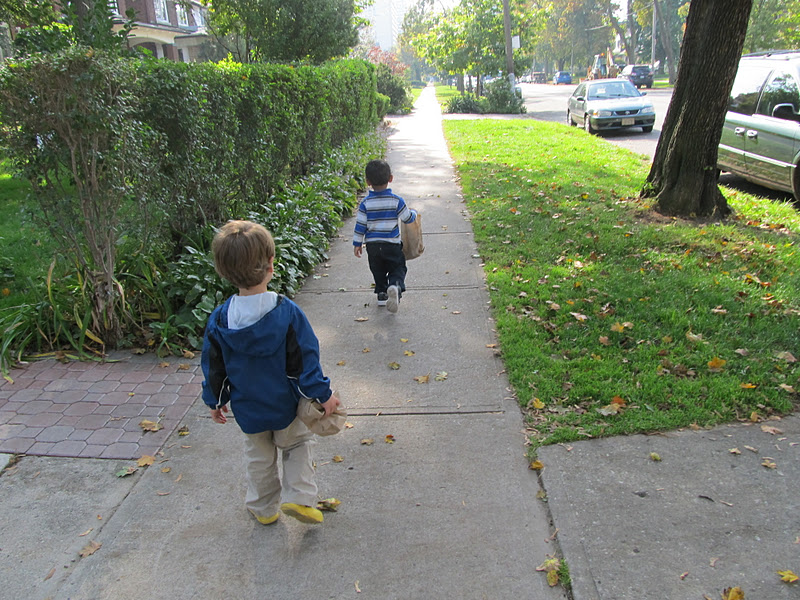

At the halfway point, it was Noah's turn to ride in the wagon while Aidas and B. searched for their favourite leaves. We gave some leaves to Oscar to hang on to. He obviously needed to be closely monitored lest he consume an early lunch of leaf and paper bag. (He LOVES a good paper snack!) Aidas and B. started out collecting leaves, but eventually became far more interested in trucks and fire hydrants. 

Later that day, we emptied our leaves onto the table. (I had disposed of the "unhealthy" ones.) We attempted  a leaf colouring activity. You know, the one where you put the leaf under the paper, then rub your crayon on top of the paper until you see the shape of the leaf? Well, apparently they are not quite ready for this yet. Not only was it difficult for them to do, but they also had trouble seeing the leaf shapes after I helped them to colour. We'll give it a try again next year when Noah is 4. Perhaps we'll simply try gluing the leaves onto paper in the meantime.


Here are Aidas and B., having a blast with Noah's wooden train set (which has been greatly embellished by a birthday gift from Auntie Krista and Uncle Scott). Oscar loves to take the track apart, which does not please them.


And here's the sleepy-head. It usually takes quite a while for Noah to agree to leave the comfort of his bed after we wake him up from his nap. (He is always the last one still sleeping.) If I really want him to get out faster, we all have to leave his room (once he is fully awake) and take the party to the living room. Only then will he demand to be freed.


We've also been visiting the Early Literacy Program at Indian Road Public School. There are so many activities for the kids to enjoy there! It's a very busy place and I barely have time to snap a photo. The two pictures above were taken on a day when we met Marlaine and the twins there. The lady that runs the program is absolutely fantastic. We love her, and the way she runs music circles. 


We played hockey outside one day. I had to show the boys how to hold the stick again, but once I did they caught on pretty quickly! Oscar crawled around chasing after his own ball, basically using his hand as a hockey stick.


And here's the little guy practicing his crawling skills at Lithuania playground. He's getting lots of head bonks and bruises, which I remember so well with Noah and Aidas at this age. In fact, he sustained a minor injury shortly after the tunnel picture was taken. Poor little guy!


We played Grocery Store with Noah's new pretend cash register this week. In one picture, we have our youngest customer ever making a purchase at Loblaws. In the second picture, we have B. purchasing eggs by opening the carton and choosing his favourites. I had no idea eggs were sold individually! 

Monday, October 24, 2011

Easy Paper Witch Hat Decorations for Toddlers


Materials:

Method:
  1. Print off a free witch hat template at http://familycrafts.about.com/od/halloweencoloringpages/ss/Witch-Hat-Coloring-Page.htm) and cut it out
  2. Trace the outline of the hat onto black construction paper. Cut it out.
  3. Cut the band of the witch's hat out of the template. Trace the outline of the band onto orange construction paper. Cut it out.
  4. Glue the orange band onto the black hat cut-out.
  5. Provide child with stickers to decorate the hat with.
  6. When the child is finished, write the first initial of their name on the orange band, it there's room. (If not, find another open space on the hat in which to write their initial.) 

Friday, October 21, 2011

Halloween Craft for Toddlers: Paper Pumpkin (Jack-O-Lantern) Decorations


Materials:
  • orange construction paper
  • yellow foam sheet/s
  • black felt
  • Sharpie marker
  • pencil
  • scissors
  • white glue
  • Popsicle sticks

Instructions:
  1. Using a pencil, draw different sized pumpkins on orange construction paper. Cut them out
  2. For the large pumpkins, cut out appropriate sized eyes, noses and mouths from the black felt. To give the kids some choice, cut different shapes for the eyes, such as circles, triangles, and crescents (for a winking pumpkin face). They could also choose from circle shaped mouths, smiles or frowns. (I kept the noses simple and made them all triangles.)
  3. Do the same for the smaller pumpkins using the yellow foam, cut into smaller shapes.
  4. Draw with pencil on each pumpkin stars where the eyes should go, a swirl where the nose should go, and a line where the mouth should go.
  5. After providing the toddlers with glue and a Popsicle stick each (though they could also use their fingers), give them one small step at a time to follow at a time. (Eg. Put lots of glue over one of your stars, and then I will give you an eye to stick on. Withhold each facial feature until they have put enough glue in that spot, to keep things less confusing for them.
  6. Once they have finished each jack-o-lantern, write the first initial of their name in Sharpie marker on the stem of the pumpkin. (This helps with teaching them what letter their name begins with, since they are motivated to find the jack-o-lantern they made when they later see the various decorations on the wall.
  7. Decorate the area with the finished masterpieces (some could even go on the door). (I used clear plastic tape to stick them up. Yep, my home is very classy.)


Thursday, October 20, 2011

Apple Picking at Chudleigh's


Last weekend Dan and I took Noah apple picking at Chudleigh's, located 9528 Highway 25 in Milton. It's getting late in the season, and not all apple types are available for picking. Still, we had a great time picking Fuji and Red Delicious apples!


Noah immediately went for the apples that were the easiest for someone of his size to get at: those on the ground. Obviously, some of those that he collected were bitten into, or looked like they were starting to rot. He thought they looked just fine! (We had to sneakily ditch his bag when he wasn't looking and tell him we had combined the apples into two bags.)


It's been ages since I've been apple picking. Actually, I haven't been since I was a kid. The day we chose to go turned out to be quite cold and dreary, but it was such a nice family experience that it seemed as if it warmed up throughout the afternoon.


Noah absolutely loved it. It was so cute to see him carrying his own little bag and busily looking around for the right apples to put in it.


There is a beautiful forested area which you can just see the outside of in the pictures above, and a walking path that runs through it. We wanted to walk through this fall wonderland, but not with two heavy bags of apples. We thought we'd bring our loot back to the car and take the path later on, but we never ended up returning to it. Next time!


And what kid doesn't love a tractor ride? The tractor took us to and from the apple picking area. It wasn't really that far, and we could have walked, but that's not quite as fun! 


Next we picked out a pumpkin to take home. There wasn't a big selection, but there were enough that we could find a good, medium-sized pumpkin (that Noah and the kids will later scoop out). There were a few stationary tractors that kids can sit on and pretend, (and have their picture taken) but Noah declined on this occasion.


He was very interested in going to the little farm, however. He called it "Old MacDonald's Farm". I guess every farm is Old MacDonald's farm to him. Mr. MacDonald is one busy farmer!


There was also a little hay maze which Noah and Dan navigated themselves out of a little too easily. (Maybe they just got lucky!) There were pony rides as well, but like the tractors, Noah simply wasn't in the mood for it on this day.


He was, however, in the mood to try the enormous playground which had about 5 or 6 very large slides. There was no way he wanted to go by himself though, so I got to enjoy a ride too!


Our day was definitely worth the admission price of $10 (kids 3 and under are free, so we didn't even pay for Noah). I would do it again next year in a heartbeat!

Sunday, October 16, 2011

Fall Craft for Kids: Tree and Leaf Wall Decoration


Materials:
  • 5 white sheets of Bristol Board
  • pencil
  • paintbrushes
  • brown, red, yellow and orange paint
  • scissors
  • leaf shapes (cut-outs) that are roughly 4-5 inches in height (You can trace real leaves or use printables from the internet) 
  • 2 large (12 x 18 inch) sheets of green construction paper
  • 6 large sheets of blue construction paper
  • clear, wide packing tape
  • Velcro

Instructions:
  • On one sheet of Bristol Board, draw a tree with pencil that fills up the whole paper. (I looked at a very simple drawing of a tree, and tried to reproduce it - nothing fancy, just 7 thick branches)
  • Cut the tree out.
  • Give the kids brown paint only, and have them paint as much of the tree as possible. Place it out of reach from the kids to let it dry.
  • Rip a sheet of Bristol Board in half, and let the kids paint using only red. Set paintings aside to let dry. (It doesn't matter if they fill the whole paper or not.) Repeat with yellow paint and orange paint, using different pieces of Bristol Board. If they still wish to paint after this, give them all 3 colours at once. Set the various paintings out to dry.

  • Use a cut-out of a leaf, or a real leaf (it should be about 3 and 1/2 to 4 inches tall), to trace leaf shapes onto the yellow, orange and red paintings.
  • Cut out the leaf shapes. Place Velcro on the backs of all the leaves.


  • Find the wall space where you would like to put the tree up.
  • Using the clear packing tape, stick two pieces of green construction paper horizontally (and side by side) to the wall. Do the same with two pieces of blue construction paper, placing them directly above the green paper. Repeat two times, using all 6 pieces of blue construction paper.
  • Using the clear packing tape, stick the tree on top of this background. Tape each and every branch to the background. Once you have done this, look over every part of the tree and background, taping every bit of exposed paper edges. (Otherwise, the children most likely WILL find the little bit of edge you haven't taped down, and rip the wall display down!)
  • Stick Velcro (opposite side of what you used for leaves) onto branches of the tree, and onto the green construction paper (ground). You could also stick pieces of Velcro to the blue construction paper, so that it looks like leaves are falling from the tree.
  • Lastly, show the kids how to stick the leaves to the Velcro on the wall display. They can stick them on, or take them off whenever they please! (You could also use it to help teach colours by asking them to stick on or take off only the yellow leaves, etc.)