Saturday, November 5, 2011

Toddler Halloween Party


On Halloween Day we had an amazing Halloween party at the daycare. There was a lot of preparation to do the day before. Above is the scene before the party started. I put up black and orange balloons and orange streamers. We also had a lot of amazing Halloween decorations up already due to the crafts the kids had done the week before.


For the first little while, it was just Noah and B. They both had the same firefighter costume, and both of them wore their costume for about 2 minutes before taking it off. Noah informed me that he was going to wear his costume for the parade, as if this was the way things were done at Halloween parties.

Nonetheless, we started the celebration with jack-o-lantern punching balloons, and a Halloween memory matching game I had made for them.

After this, we played "Find the Pumpkins". Noah and B. went to Noah's bedroom, and I hid the pumpkins in the living room, dining room and kitchen. There were a lot of pumpkins to find, and they needed some clues here and there, but I think they enjoyed the game after they started to get the hang of it. Noah especially liked counting the pumpkins each time he or B. found one and added it to the group.


Noah and B. had a snack of "Halloween Fruit" and jack-o-lantern cookies before the rest of the gang arrived (Oscar, Aidas, Lucas and Maya).


It didn't take long for the rest of the kids to join us at the table. Who can resist cookies with chocolate?


Okay, things start to get even more adorable from here on in. We have: 2 firefighters, two tigers, one lion, one police officer, and a deviled egg (Marlaine, not me). 


We took a walk around the block, wishing everyone a Happy Halloween. As we passed the High Park Early Learning Centre, we saw many children in front of the house. The kids checked out each other's costumes and wished each other a Happy Halloween.


All the kids were adorable in their costumes, but there was something about Aidas in his police officer's uniform that was so RIDICULOUSLY cute, I just couldn't contain myself! I couldn't stop laughing and hugging him every time I looked at him. How precious is this? Actually, my blog is a fantastic place to come if you're having a bad day. You get to see such cuteness. (I don't have time, nor is it appropriate to capture most tantrums or meltdowns. So, you get to skip most of the "ugly"!)


Maya wanted to hold hands with one of the kids. She was denied by her brother (because that's what brothers do, of course). She was surprisingly rebuffed by Noah, her biggest fan. Perhaps it was his plan to play hard to get, so she would work harder for his attention. (He will learn in time that reverse psychology doesn't go over well with girls.) It was B. who graciously accepted the request.


We stopped to watch some men who were being lowered on a scaffold (very exciting) while they were working on a building. Shortly after this, as you can see, Noah realized his strategy was not getting him anywhere and held Maya's other hand. Marlaine and I kept adoring the scene from behind: a girl being safely and lovingly escorted down the street by two firemen.


I also thought it was so cute that the musical instrument Lucas chose to take on the parade was the drum. It's a rather big instrument to walk around the block with, but he played that drum as if he were in a real marching band. He is a very good drummer!


When we got back to the apartment, we played "Ghost Toss". The kids stood a foot or two away from a waste basket decorated as a ghost. They then tried to throw lollipops (also disguised as ghosts) into the bin. Noah and B. especially liked this game. I love how you can see the ghost B. is throwing in mid-flight, in the photo above. All the kids got Halloween stickers to place on an orange Bristol Board card (with their name on it), whether they got the ghost in or not.
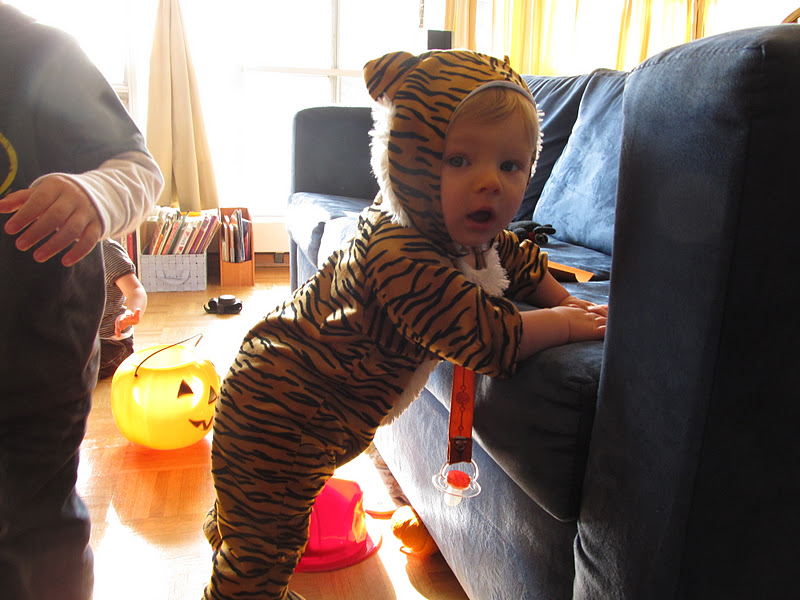

Don't think I've forgotten about this cutie. Isn't this the most precious tiger cub you've ever seen? Although (at 10 months) he couldn't participate in the festivities to the same extent as the older boys, he seemed to enjoy himself just the same. Here he is with his orange card. He really liked the Halloween sticker he got and was very skilled at peeling it off the card. (Seriously, I wouldn't think a 10 month old would have the fine motor abilities to do this!) 


Speaking of skill, Aidas was the mastermind who first uncovered the ghost costume his lollipop was wearing, as well as the wrapper. This happened quickly, because Marlaine and I didn't even catch it until it was in his mouth! So then, of course, all the kids had to have a mini-pop appetizer before lunch.


The kids enjoyed their ghost pitas and jack-o-lantern sandwiches for lunch. Oscar enjoyed his mush.


After lunch, the children played together while I cleaned up. Finally, it was time for naps, and we had to say good-bye to Lucas and Maya for the day. What a fun morning we had!


After my gang woke from naps, we played some Halloween games again before we ate dinner. Guess what we had? Meatball spiders and monster fruit faces! Noah is a very literal guy. Every time I said "We're having spiders for dinner!" he would correct me and say "No, we're having meatballs". Apparently, my term "monster fruit faces" was okay, because I correctly stated that it was made of fruit. I'm sure if I had said "We're having monster faces for desert!" he would have replied, "No mommy. We're having fruit."


You can find more about my Halloween games and recipes by clicking "Halloween Crafts and Activities" under "Browse Posts" on the main page.

Thursday, November 3, 2011

Halloween Party Games and Activities for Toddlers


Ghost Toss

Materials: 
  • waste basket
  • white Kitchen Catcher bag or white garbage bag
  • black or orange yarn
  • black marker
  • lollipops (round ones like Tootsie Roll - I used mini Tootsie Roll pops)
  • black construction paper
  • tape 
  • Halloween Stickers
  • Squares (the size of a large birthday card) of orange Bristol Board 

Instructions:
  • Cover a waste basket in a white Kitchen Catcher bag, or a white garbage bag. It just needs to cover the outside. Tape it to secure it. 
  • Cut 3 circles out of black construction paper. Tape them to the white bag on one side of the waste basket to make a ghost face.
  • Cover each of 5-10 lollipops in Kleenex, and tie a piece of yarn just under the candy part.
  • Draw 3 dots on the ghost's head (candy part) to make a simple face.
  • In black marker, write one child's name on the top of each of the orange squares of Bristol Board. (Each child/player should have their own card).
  • Have children take turns. The child (whose turn it is) stands a few inches behind the waste basket (mommy ghost) and tries to throw the lollipop (baby ghost) in. Each child gets 3 tries, and receives a Halloween sticker regardless of whether he/she gdts it in. Give them their card after their turn, so they can put the sticker on it.
  • When children tire of the game, they can continue choosing and adding stickers to their cards.


Memory Matching Game

Materials:
  • orange Bristol Board
  • medium to large Halloween stickers (8-12 pairs of stickers - each pair should look exactly the same)
  • scissors

Instructions:
  • Cut 3 inch by 3 inch squares out of the orange Bristol Board. How many you cut depends on how many you would like to use in the matching game. I cut out 16 (8 pairs) for the 3-year-olds in my care. I wouldn't recommend more than 10 pairs (20 cards) for toddlers, since they are just learning how to play formal games and it could get overwhelming for them.
  • Place one sticker on each square, making sure you have cards with matching stickers for the number of pairs you wish to use.
  • When you are ready to play the game, shuffle the cards and lay them out, face-down on the floor. Have each player take a turn flipping over any 2 cards. (Make sure all players can see these two cards.) If the two cards match, the child keeps them until the end of the game. If they don't match, the child turns them back over. Keep playing until all the cards have been matched. The player with the most cards at the end of the game wins.


Find the Pumpkin

Materials:
  • 10 small pumpkins

Instructions:
  • Have the kids stay in one room while you hide the little pumpkins in another room. Then have them come and find the pumpkins! You can give them clues if they are having difficulty. It's also fun to count the pumpkins each time you find one. Then you can see how many you still have left to find.
  • You can also play this game outside, and even hide them in the leaves!


Halloween Parade
  • With kids dressed in costume, take a walk around the neighbourhood, wishing everyone a Happy Halloween. You can bring musical shakers or other noise-makers to make a real commotion!


Pumpkin Bowling

Materials: 
  • 3 of your large, plastic recyclable bottles
  • 1 small pumpkin

Instructions:
  • Stand the 3 bottles up, close together. Have each child take a turn rolling the pumpkin and trying to knock them down. 


Pumpkin Rolling

Materials:
  • one small pumpkin per child

Instructions:
  • This is probably best done as an outdoor game. Have children stand a few feet apart and side by side. See who can roll their pumpkin the farthest. It is also a great game to play at the top of a hill.


    Halloween Puzzles

    • Gather paper cut-outs of Halloween objects. They can be hand-made or store bought. Cut the objects into 2 or 3 pieces to make a simple Halloween themed puzzle.

    Other
    • colour Halloween themed pages
    • stick Halloween stickers to little paper books, squares of Bristol Board or to a large paper (collage of stickers)
    • Halloween themed crafts and food ideas can be found on my site by clicking "Halloween Crafts and Activities" under "Browse Posts"

    Tuesday, November 1, 2011

    Healthy Halloween Dinner Recipe: Meatball Spiders


    So, if you know anything about spiders you will pick up on my mistake right away. Yes, spiders have 8 legs, not 6. Oops. But you will correct this when you try it, right? 

    This dinner idea is simple. Throw some cooked spaghetti on a plate to represent the spider's web. Use a medium to large sized meatball to represent the spider's body. For the spider's legs, use cooked carrots, cut into thin sticks of appropriate length. Lean them onto the spider's "body".

    Tell the kids they're having spiders for dinner. Yum!

    Healthy Halloween Snack Idea: "Fruit Monsters!"


    You can provide a healthy desert or snack before they go trick-or-treating and eat all that candy! Simply make a scary face on a plate, out of fruit. I used peach slices, halved strawberries, banana slices and halved grapes. I'm not terribly artistic, so I'm sure that many of you can do much better than this! It's just such an easy, healthy option, and the kids love it!

    Healthy Halloween Snack Idea: "Halloween Fruit"


    On a day when you know your kids will be getting lots of junk food, here's a fun, Halloween themed, easy, healthy option. I call it Halloween Fruit because it has the colours of Halloween (more or less). Simply mix slices of clementines and raisins together. Done!

    Halloween Recipe: Jack-O-Lantern Cookies


    I originally got this idea by taking "this and that" from different cookie recipes. Then I continued to change the recipe so much as I went along that I think I can now safely call it my own.

    Ingredients:

    • 1 stick of butter (1/4 of pkg.)
    • 4 teaspoons of milk
    • 1/2 teaspoon of vanilla
    • 3/4 cup of sugar
    • 3 cups of flour
    • orange food colouring (mix 12 drops of red with 10 drops of yellow)
    • 1 egg
    • 1/4 teaspoon of salt
    • 1/4 teaspoon of baking powder
    • chocolate chips 
    • pumpkin or circle shaped cookie cutter
    • spray oil

    Instructions:
    1. Preheat oven to 375 degrees.
    2. Lightly spray a cookie sheet with oil.
    3. Mix soft butter with a fork until it's fluffy.
    4. Add sugar, egg, milk, vanilla, and food colouring. Mix well.
    5. Mix in the flour, salt and baking powder until well blended.
    6. Roll the dough out onto a lightly floured surface.
    7. Cut out shapes using the cookie cutter, and carefully place them onto the cookie sheet.
    8. Use the chocolate chips to make faces.
    9. Bake in the oven for 10-12 minutes.
    10. Let cool for 5-10 minutes.
    *Makes about 12 cookies.

    Monday, October 31, 2011

    Healthy Halloween Recipe: Jack-O-Lantern Sandwiches


    Ingredients:

    • whole wheat pita bread
    • cheddar cheese
    • cooked peas
    • pumpkin or circle cookie cutter

    Instructions:

    1. Use a pumpkin cookie cutter to cut pumpkin shapes out of pita bread
    2. Slice cheddar cheese and place it onto the pumpkin, to that every spot except the stem is covered.
    3. Put it in the microwave for 15-20 seconds to melt the cheese.
    4. Place the peas on the pita with melted cheese to make a face
    5. Place the jack-o-lantern sandwiches on a baking sheet and put in the oven for 4-5 minutes on 350 degrees.
    *If making ahead, after step 4, separate the sandwiches with wax paper and place in an airtight container in the refrigerator. Complete with step 5 when you are ready to serve them.