Tuesday, March 29, 2011

Pretend Play: Grocery Shopping

We pretended the living room was a grocery store on Friday. We took all the toys off of the shelves you see in the photo above. Then we restocked them with Noah's plastic food toys and empty food containers that were about to go in the recycling bin. Okay, so it looks a bit like the shelves you might find in a third world grocery store. But it was the first time we attempted this game, so supplies were somewhat low. The kids didn't seem to mind...well, except for M. and L. both desperately wanting to purchase the one and only container of hummus!
I gave them all pretend paper money I have for teaching, which you see Noah handling in the photo above. M. is pushing the one "shopping cart" we had, while the rest used "shopping baskets".
I was the cashier, and every single purchase came to precisely 5 dollars, or 10 dollars. Noah kept coming to the cash with food, but no money. When I told him "These things cost money. You can't have them for free!" he would giggle, and then scan the room, where some money would be lying around, and return to the counter with his cash. L. kept coming to me and just giving me money. It was so cute - they were all getting bits and parts of the grocery shopping scenario.
After each purchase, I bagged their groceries for them. I even (though only momentarily) had them in line at the cash! They responded in good humour to my acting role as a cashier. I had to be firm with "rude customers" jumping the line, or taking others' purchases as their own at the counter. It was a real hoot! 

Thursday, March 24, 2011

When Kids Grab Toys: Tips and Tricks


The most common word I hear from the 2-year-olds in my daycare is "Mine!". At this stage of their lives, this is a completely acceptable way to say, "I'm playing with this right now. Don't take it from me!" As mentioned in the "Time-outs for Toddlers" post, grabbing toys is the biggest offence in the daycare by far. And from the earliest days of running the daycare, I have had a 'no grabbing' policy. I know that there are other ways to handle this situation, one of them being to distract the toddler who just lost their toy, perhaps with another toy. I know also that the toddlers probably can't conceptualize why grabbing is wrong. Still, I am very stubborn when it comes to providing an environment of fairness when it comes to the daycare, even if they don't get the bigger picture yet. Some may argue that this is unrealistic, since the world often isn't fair. I figure they have plenty of time to learn about the big bad world. For now, I can do my part in teaching them to value fairness, and to respect their peers. This is not to say I have been that successful in minimizing the grabbing attempts; they come by it honestly, being 2-years-old and all. But they are more able to change their behaviour with verbal reminders now. (It is extremely rare for one of the tots to receive a time-out for not releasing their vice grip after a few warnings.) I have created the following list of techniques for dealing with this issue when managing a group of young children.


Ideas and Techniques
  • Always look for the intention behind the behaviour. If you're not sure, make a guess given the information you have. For example, if a child has just grabbed a toy from his peer, what could be his motive? Is it because he really wants to play with the toy? Is it because he wants to play with his peer and can't find a better way to show it? Is it purely to see the strong reaction he can get from his peer, or from the caregiver? Is it because he thinks the toy belongs to him? (Maybe it does, but he still has to learn to share!)
  • When possible, do the following techniques after the 1-2-3 warning outlined in the "Time-out for Toddlers" post.
  • If you think it's because the child really wants to play with the toy, promise him a chance "in 2 minutes".  Inform the group (in a loud and clear voice) that it will be Bobby's turn in 2 minutes. After about a minute, remind both kids that it will be Bobby's turn in one more minute. After about another minute, you can say something like, "Okay, it's Bobby's turn. Johnny, give the truck to Bobby now." (Nine times out of ten this technique works perfectly. Both children feel like you've respected their wants.) If Johnny is sad at having to give the toy to Bobby, repeat the technique, telling both that it will be Johnny's turn again in 2 minutes.
  • If you think it's because Bobby really wants to play with John suggest a way that they can play together. Perhaps Bobby can help John load his truck up. Perhaps Bobby can get a different truck (for example) and drive his truck behind John and his truck. Perhaps Bobby can just watch what John is doing. (I always try this last approach when one child tries to grab a book from another. If they don't touch, they can sit beside their peer and look at the pages with them.) Still, if a child truly wishes to play alone, I believe she should have the right to do so. The best thing to do in this case is to tell Bobby that John wants to play by himself right now, and show him another toy or peer (a fair distance away) that he can play with. He may not fall for the distraction, and show displeasure at this, but this is his only option at this point.
  • If you think the child is grabbing a toy to get a reaction from either his peer or yourself, simply follow the "1-2-3-time-out" approach outlined in the "Time-outs for Toddlers" post. Make sure your reaction and deliverance of the technique is low-key, so you don't reinforce the behaviour. At other times encourage other methods of interaction the toddler can use (e.g. "Hi John", high-five, getting different toys and playing with John).
  • Often, a child who attends the daycare will bring a toy from home. When this happens, there is an immediate swarming effect from the group, like a pack of hounds around a slab of meat. I think in this situation, it is best to let the child who brought the toy have the first turn. Then, follow the 2-minute turn approach outlined in point #3, for the whole group. 
  • Anytime you see a child choosing a different approach than grabbing (e.g. asking, watching), praise the behaviour. Make sure the whole group knows how proud you are that the child put in the effort to try a more positive and respectful behaviour, even though he really wanted the toy right away. 

Monday, March 21, 2011

Toddler Fun at Bronte Creek Maple Syrup Festival

Noah, his big sister Emily, her man Dave, Dan and I went to the Bronte Creek Maple Syrup Festival on Saturday. It was so much fun!
We started off with a wagon ride to the pancake house. It was really exciting for Noah, since the wagon was pulled by a big green tractor.
Noah normally loves syrup, but ironically wouldn't touch the stuff on this day. Perhaps he was confused because it was served in small plastic cups; not the usual store bought bottle he's used to. He still enjoyed the pancakes, and the bacon even more so!
After some breakfast (and coffee, of course), we took a guided tour down Maple Lane. Our tour guide taught us how to tap a tree for its sugar and how syrup production has changed over the years.
Next, we got to see some animals. Here's Noah with his Daddy, looking at the peacocks. Noah has seen peacocks at the High Park Zoo, but this is the first time he got to see one showing off his beautiful feathers!
We also saw cows and pigs. There were two huge pigs making a lot of noise, and many piglets snuggling up for a nap. Noah seemed satisfied with the animals he saw, even if he was initially hell bent on seeing chickens.
We got some fresh maple sugar (shaped as maple leaves) at the candy shanty.
Noah walked around the bales of hay, and then I helped him to walk on top of the hay, like the big kids. He was so pleased with himself!
Dan bought us all maple sugar lollipops. Then we toured the old farmhouse from the 1890's. Noah enjoyed this too, and was very well-behaved. He's been to enough museums and art galleries now that he knows to abide by the no-touching rule.
Finally, it was time to head home. Above, li'l bro and big sis enjoy a little shut-eye after a very busy day! For more information on the Maple Syrup Festival at Bronte Creek, visit www.BronteCreek.org and click on Maple Syrup Festival. This coming weekend is the last weekend for the festival. Check it out! It's a fun way to spend time outdoors!

Thursday, March 17, 2011

Paper Plate Craft for Toddlers: Cat Mask Puppet Using Shapes

This simple craft helps to teach toddlers about shapes. The finished product can be used as a mask (though not one they can see through) or a puppet. As with all craft activities undertaken with children, it is best to do it yourself first. This way, you have a model to show the kids, so they have some idea about what their craft should look like. You can also make any adjustments that are needed.

Materials:
  • 1 plain white paper plate (the flatter, the better)
  • yellow, orange, and black construction paper
  • 1 large popsicle stick
  • white glue
  • container for glue (small paper plate works well)
  • pen
  • clear tape

    Preparation
    • From the yellow construction paper, cut out 2 ovals roughly 5cm long and 3cm wide. (These will be the eyes.)
    • From the black construction paper, cut out 2 smaller ovals, roughly 3cm (they have to be as tall as the yellow oval is wide) by 1cm. (These will be the pupils.)
    • Also from the black construction paper, cut out 2 triangles. Make each with a base of about 7cm and a height of about 7cm as well. (These will be the ears.)
    • Also from the black construction paper, cut out rectangles that are about 15cm long and 1cm wide. (These will be the whiskers.)
    • Finally, from the orange construction paper, cut out 1 triangle with of a base measuring about 6cm, and a height of 4cm. (This will be the nose.)
    • With your pen, make 2 small dots near the top of the paper plate, where the eyes will go.

    Activity
    1. Tell the child you are going to make a cat mask together. Give the child a paper plate, and ask them what shape it is. Tell them that this circle will be the face of the cat. 
    2. Show the child the 2 yellow ovals, and talk about this shape. Tell them that the yellow ovals will be the cat's eyes.
    3. Give the child a container with a few squirts of glue in it. Show them how to dip their finger in the glue, and spread some "on top of the dots". Then have them place the 2 yellow ovals over the dots and press to stick.
    4. With your pen, draw a little dot in the middle of each yellow oval. Take out the 2 black ovals and ask the child what shape these are. Show them how they are the same shape as the yellow ovals, only smaller.  
    5. Tell the child to use their finger to spread glue on top of the dots on the yellow ovals. Then have them place the 2 smaller black ovals over each of these dots. They will need some assistance to make sure the ovals are positioned lengthwise.
    6. Draw a small circle where the nose will go. Draw faint lines coming out from the nose; 3 on each side.
    7. Show them one of the "whiskers" and ask them what shape it is. (This is tough for them, since it is such a long rectangle.) Tell them that these will be the cat's whiskers. 
    8. Show them how to spread glue over the lines on one side of the plate first. Help them to stick 3 "whiskers" over top. Repeat with the other side.
    9. Show them the orange triangle and ask them what shape it is. Tell them that this will be the cat's nose.
    10. Point to the nose area, and ask them to spread some glue into the circle you've drawn on the plate. Give them the orange triangle and ask them to press it onto the gluey circle.
    11. Draw a mouth coming down from the nose. A forwards and backwards "J" coming down from a single line at the bottom centre of the nose works well.
    12. Turn the plate over. Place a black triangle at one side of the top of the plate. Tell the child that the cat needs ears now.
    13. Get the child to help you press the clear tape down to make the ear stick to the plate. Do the same with the other triangle. Then turn the plate back over to the face side. Have them help you stick the ears to the plate with tape on this side as well.
    14. Finally, turn the plate over, and use many pieces of tape to stick the top of the Popsicle stick to the bottom centre of the plate. The child should be able to hold the mask in front of their face by holding on to the popsicle stick.
    I was lucky that Aidas and B. woke up first from their naps on this day. They did the activity first, and I was able to give my assistance to just the two of them. They thoroughly enjoyed the craft. They kept saying, "Meow. I'm a cat!" Over and over and over.

    When we finally had to wake up Noah, L. and M. from their naps, we went into their rooms with our masks (I had made one myself as a model), saying "Meow. I'm a cat!" Noah, L. and M. found this humorous. (Two-year-olds: not a tough crowd.)

    Noah, who had been begging me to do the craft before nap time, now showed no interest in taking part in the activity. L. and M. were excited to make their masks. However, their attention spans did wander, and about 2/3 of the way through the craft they stated that they were "All done". This made me giggle, since this is what they say when they are finished eating a meal. I rushed them through the rest of the craft so they could run around and play with their finished masks. 

    Sunday, March 13, 2011

    An Indoor Homemade Slide, and Splashing in Puddles Outside!

    There seems to be a theme emerging here: How many uses can we find for an empty diaper box? First we used them to make huge building blocks. This week we used one to make an indoor slide. I am getting more ideas though, so stay tuned!
    After taking turns on the slide, we decided to use it as a car ramp.
    Noah and I picked up new strips of letters and numbers at Dollarama last weekend. The kids had fun using the alphabet strip to sing the ABC's. Of course, it's also fun to walk along and drive toy cars along the alphabet strip!
    It was raining lightly on Thursday, and not too cold, so we went out to splash around. Little did we know we would get to witness a car being hooked up to a tow truck! Oooooo! Aaaaahhhh! The kids were mesmerized! (And it's slightly ironic that I had to call a tow truck that night due to a flat tire.)


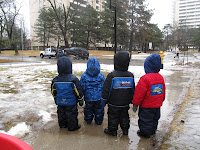
    Here are the kids, practically wading through puddles! Fun! Their feet were obviously soaking wet. Hopefully we will all be armed with rain boots next time! We plan to do a ton of splashing in puddles this spring. I have of late, begun to embrace the joys of childhood mucking around (at appropriate times of course - not at the dinner table!). It's not that I prevented them from getting dirty before, but I feel that I am actually encouraging it now. I remember how much fun I had as a kid with the freedom to get messy outside, and I want to make sure I am giving them the chance to fully enjoy and explore mother nature.


    Since we're on the subject of outdoor play, I'd like to share one of my pet peeves regarding this subject. What is it, you ask? Dog poop. As the snow melts, it is evident that most the people who walk their dogs around the apartment buildings here do not pick up after their dogs. It's not a matter of me saying to the kids, "Stay away from that area. There's dog poop there". It is everywhere. We can barely take a step without coming across some. 

    Funny story. A few weeks ago, I decided that I would try to clean up what I could with a few plastic bags, while we played out there. Although I always tell the kids not to touch it, it dawned on me that I hadn't been clear enough when I heard Aidas call out "I got some, Charla!". I waited in horror as he walked towards me holding something in his bare hand. Sure enough, he got some. I cleaned his had thoroughly with wipes, and explained to him (and all the kids) more clearly this time, that they were not to touch the dog poop. We continued to play, and I continued to scoop. Two minutes later I hear, "I got some more, Charla!" I still have to laugh when I think of Aidas walking towards me, earnestly trying to help. This goes way past mucking around.

    I really wish people would pick up after their dogs. Even though I picked up and tossed (in the convenient garbage can available for just this purpose) A LOT of poop that day, I barely put a dent in the problem. If the situation continues, it may mean that we have to play in a concrete area across the street, as the temperature rises this spring. Playing in the clean green grass should be their right. 

    Wednesday, March 9, 2011

    News from the Twos

    The kids enjoyed gluing foam dinosaurs and ABC's last week. We tried using white glue and large Popsicle sticks (to dab the glue onto the paper) this time, instead of glue sticks. It was a lot easier for them. 
    Noah, who is usually not too into the arts and crafts, spent longer than the others at this activity. At first I was a little bewildered. I soon clued in that it was the 'letters of the alphabet' aspect of this activity that hooked him. He loves the alphabet, and has known all his letters for some time now! (A mommy can brag, can't she?)
    Aidas awoke from his nap before the others one day, and assisted me with taking their paintings down from the wall. I have to admit, these finger paintings were hard to send home. They were beautiful! Aidas had done one that looked like a sunset. L.'s paintings reminded me of waves in the ocean. Anyway, Aidas was just too cute in his dungarees...I had to snap a picture! 
    We took out the colour matching activity from Valentine's Day. This little video shows them busy doing their toddler work!
    We also did the shape matching activity (using a shapes poster, and shapes from both puzzles and shape sorters). They are all very good at matching the basic shapes. They can also name most of the simple shapes. Identifying the square remains tricky for them, and they often call it a rectangle. It is difficult to explain the difference of these two shapes to 2-year-olds. I usually just point out that the rectangle is longer.
    Beading is one of our special activities. It is great for helping kids to improve their fine motor ability. What I'm really liking about this activity lately is that the kids are quite skilled at it, and the focus has turned to sharing. There are two strings for them to place beads on, so 2 or 3 kids usually have to take turns. Because they are getting so good at beading, it doesn't take long before each of them gets a turn. They can wait this brief period of time without getting agitated or losing interest. It was fantastic to see each child pass the string to a friend after taking a turn.
    And then there was crazy painting day. And it WAS most definitely crazy. I had the kids paint boxes that I had wrapped in white paper. (See the previous post titled "Jumbo Building Block Painting Craft"). I put a tarp down before we began painting, but it wasn't quite big enough. And, of course, kids this age can make it bunch up just by walking on it.  
    So, although the above picture is deceiving, (it was early on in the activity), it got messier than I ever expected. They stepped in the paint trays, rested their elbows in them as they painted, and at one point, L. even went so far as to paint his sister. In short: they had a blast! But in their minds, the painting activity paled in comparison to the "crazy bath"!
    Rub a dub dub - too many kids in the tub! They loved it! I did it partly to clean them up, and partly to shake things up a bit. They were so excited to play with Noah's bath toys, and they just thought it was hilarious; as did I! And yes, they got fully shampooed and washed. What a frenetic pace as I took them out of the bath one by one: diaper, brush hair, lotion. Then they got a chance to run around for a moment in their diapers (another highlight for them), before getting some clean clothes, and lunch. 
    This was one incredible day I will always remember. Hopefully, somewhere in their two-year-old minds, they will too!

    Sunday, March 6, 2011

    Jumbo Building Block Painting Craft


    I had the kids paint their own giant building blocks this week. Here's how to do it:
    1. Save your empty cardboard boxes. I used 2 large diaper boxes, 1 wipes box, and 1 tissue box.
    2. Use large clear tape to secure the boxes in their closed positions. Place tape over the opening of the tissue box to make a barrier for the opening. 
    3. Wrap the boxes using large sheets of white paper and scotch tape. After wrapping the boxes, tape every fold of paper on the boxes so that no little fingers will be able to rip the paper off.
    4. Have the kids paint the boxes. Let them dry. Voila!